Reduction linocut edition
- La'la
- Nov 7, 2020
- 3 min read
Updated: Nov 8, 2020
“Resurrection of demons”
In this project, I was using a single block of linoleum to create the reduction linocut edition.

First, I chose a detail of my popup book image as a working drawing that I was going to create an edition from. I used photoshop to edit it to make it one single image. In this step, I simplified the image to be more practical for making reduction linocut without press at home considering the time frame that I had. Therefore, I decided to ignore faces in the background and changed it with simple light grey. The original image I chose for this project is black and white. I decided to not change the colour pallet, so I started printing with the lightest grey and ended the printing with black in the fourth layer.
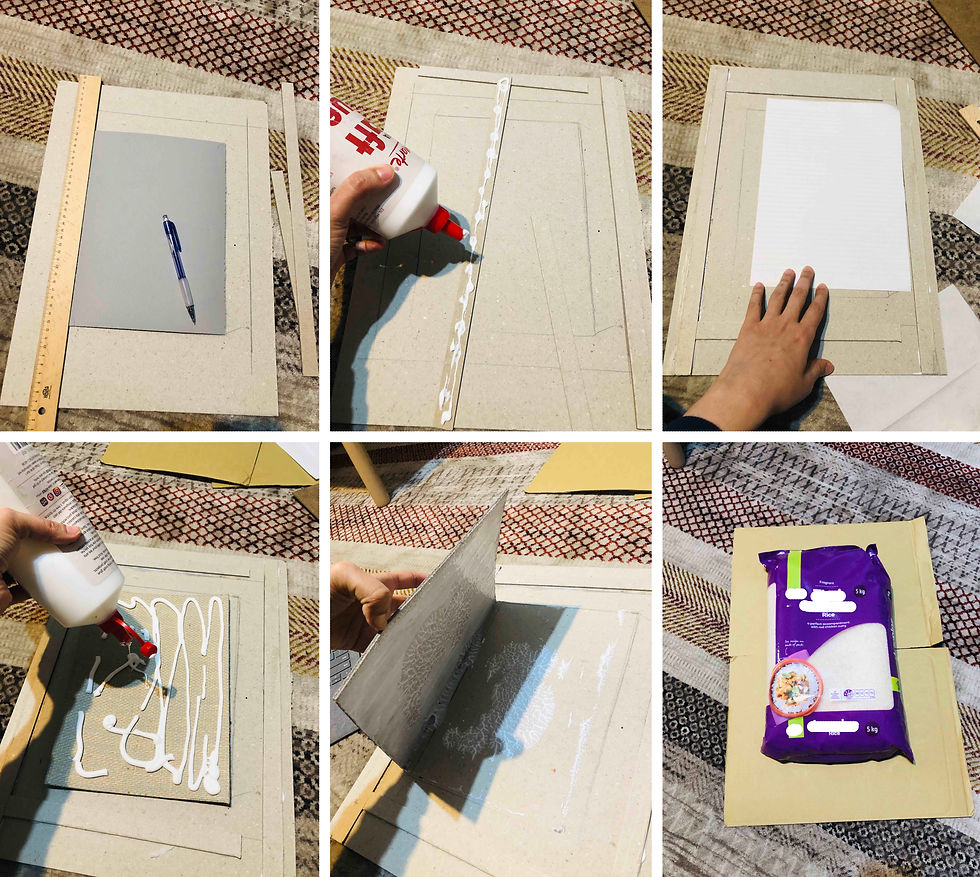
The next step after making the image ready was to set up my registration board. This was the part that could be underestimated. As I started printing, I realised that one of the most important keys to having a good edition was having a perfect registration board. It needs to have enough border and have registration guides at right angles with height as high as a lino block. After I glue down all elements on the registration board, I put a heavyweight on top of it to help it dry out as flat as possible.
Afterwards, I traced the image onto the block through carbon paper then I used a permanent marker to redraw the image. That was crucial to not lose any information during the print and cleaning up. As I decided to use the monochromic colour of black and grey, I used purple permanent markers that made it easier to read lines.

In this project, I decided to use oil-based ink. These were photos of colours that I made for each layer. After the first layer, I ran out of white ink, so it took a while to restock. After I mixed the second colour, I realised that it was easier to make all the required colours at first, so I would be able to mix and match the right grey for each layer.

First layer: I cut out parts that I want to be white. Then I started printing with the lightest grey. I was printing by hand and I used baren to apply pressure. The first layer became the hardest layer. It took a lot of time and effort but in the end, I was happy with the result.

After I printed the first layer, I carefully cleaned up the lino block with oil and a piece of rag.

For the second layer, I cut off all parts around the images because I did not want them to be printed anymore. It took a while, but it was worth it.

These are photos of each step I applied new colour on the lino block.

These are the images developed after the second, third, and fourth layer.

These photos show step by step developing the image.


These are the photos of lino block after each section of printing. It showed that the 'suicide print' is a fair nickname for Reduction Linocut as the plate was progressively destroyed in the process.

Tip: Soap eraser was magical to clean up most of mistakes on the paper.

I signed and numbered prints. Then carefully documented prints by placing them between acid-free paper.

These are the details of my works:


Comments